How to Access Computer Science Department Servers
This section is provided for those persons who have never connected to a Unix-based server before. The primary method used is a protocol called Secure Shell or SSH.
Linux or MacOS
Computers running MacOS and most distributions of Linux include a secure shell command-line program already. (Try opening a terminal window and typing ssh.) You don’t need to download or install any additional software. (If your distribution of Linux did not include the ssh program by default, search for the ‘OpenSSH’ package with your distribution’s package manager.)
If you’re trying to create your CompSci account, use the following command-line:
ssh newacct@shell.cs.fsu.edu
Once you have created your account, replace newacct with your own CS account name.
Windows
As a student taking Computer Science course(s), you are permitted to use department owned SSH Client software Tectia. Please download Tectia.zip from this link and unzip it into a local folder. Run either x86 msi or x86_64 msi based on your operating system and follow its installation instructions.
Steps to install Tectia if you download the Tectia.zip:
- Download Tectia.zip if you haven’t done so.
- Unzip it to a directory (Very important! Do not skip this step! Do not run installer inside this zip. Unzip it first).
- Go into the directory that contains unzipped Tectia. You should see five files.
- Run ssh-tectia-client-6.5.1.873-windows-x86_64.msi. The installer will automatically add license.
- Now run Tectia – SSH Terminal. Click on the “Quick Connect” button.
First Connection
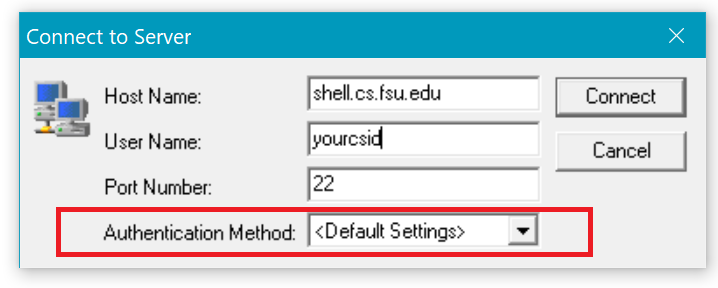
Before connecting to CS servers, make sure the ‘Authentication Method’ is set to “<Default Settings>“. See screenshot:
When you connect to a new server for the first time, your SSH client may prompt you to save the identity information of the server for future connections. Should the server identity certificate change, your client may warn you and block the connection. If you want to verify the identity of the server, you can compare the key fingerprints of our most common servers. If the server’s identity has changed, you may need to clear your certificate cache.
Next Steps
Now you can move on to the next part of the tutorial, Creating a CS account.
If you have a broken Tectia on your computer, do the following steps:
- Uninstall Tectia from your computer.
- Reboot your computer.
- Download Tectia.zip again.
- Unzip/Extract it to a directory (Very important! Do not skip this step! To unzip it, right click the Tectia.zip file and select “Extract All”).
- Go into the directory that contains unzipped Tectia. You should see five files.
- Run ssh-tectia-client-6.5.1.873-windows-x86_64.msi. The installer will automatically add license.
- Now run Tectia.
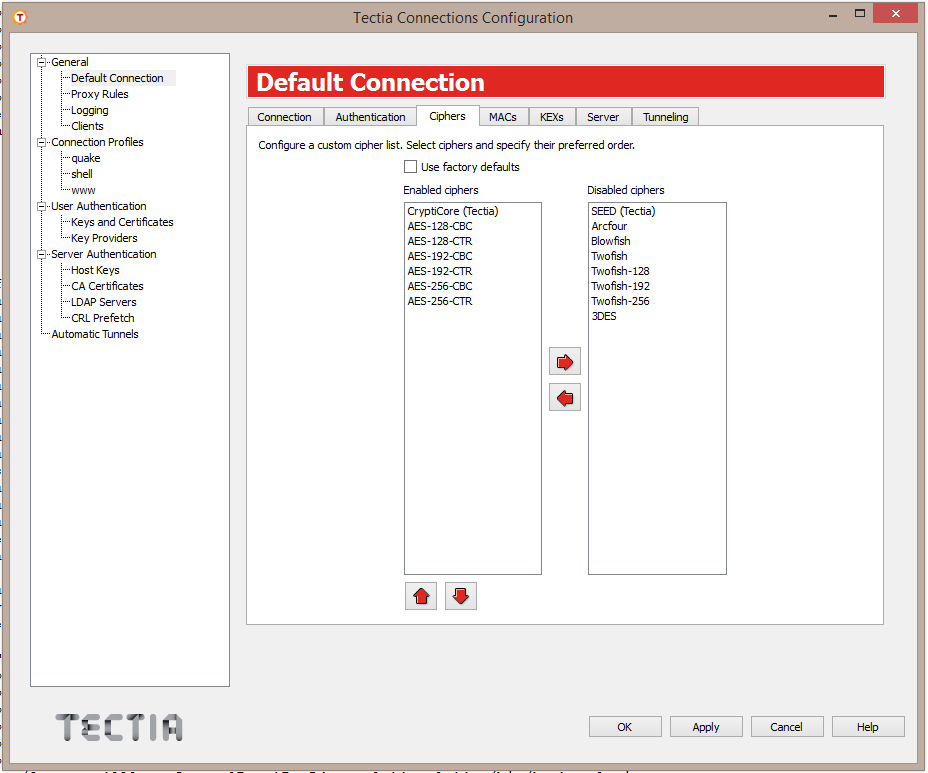
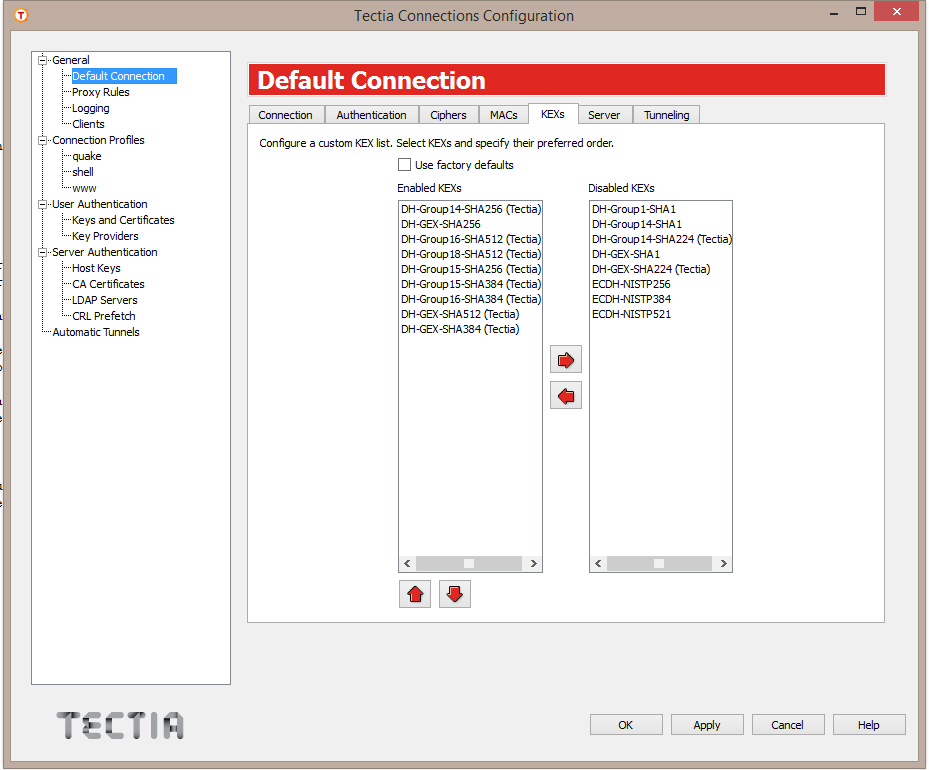
Before making your first connection, run the “Tectia – SSH Terminal” program as administrator (right-click on the program name in the Start menu or the desktop icon and select “Run as administrator”, and select “Yes” on the popup), select “Edit” → “Tectia Connections…” from the menu bar, and change your Default Connection settings to match those in the following screenshots:

Next, click “Help” → “Import License File…” and select the “stc65.dat” file you downloaded with the installation file. If there is no “Import License File…” option, you are all set and can skip this step. If you cannot see the license file while browsing in the file selection window, it is likely your computer added a hidden file extension, which you will need to remove before you can import the license file.
If you run into “Failed to start Broker GUI” error, try the following fix:
- Open a command prompt (hold the Windows key and R, type
cmd, click OK). - In command prompt, type
ssh-broker-guiand hit Enter. (Tectia Connection Status window should appear) - Then, in command prompt, type
ssh-client-g3
This should bring up Tectia. You only need to do this once. After that, Tectia should run from the desktop icon.
If Tectia still won’t run, try:
- Completely uninstall current Tectia. Remove everything related to it.
- Restart your computer.
- Download the Tectia.zip from Systems website again.
- Extract the Tectia.zip to a directory — very important. DO NOT SKIP.
- Go to the directory with extracted files and run the x64 installer. Make sure your account has admin rights.
- Proceed to install it.